The Petoi Bittle Robot Dog - Part 1
April 16, 2023
Introduction
This is part 1 of 3 of my review of the Petoi Bittle Robot Dog kit.
This kit was provided to me for free by Petoi in return for a review. I am thankful for the opportunity and had a blast reviewing this product.
In a first for my blog, read till the end to find a special discount code just for my readers: 7% off your entire order until May 14th 2023!
Part 1 of 3
I’m structuring these blog posts as follows:
- In part 1 (this post), I will focus on the kit, its materials and the build process.
- In part 2, I will focus on the Python API and explore seeing how to make the dog do a trick from scratch.
- In part 3, I will install the Intelligent Camera Module and see how far I can take its hardware.
The package
I got a real kick out of seeing Simon’s Blog on the box. This blog is little more than a creative and professional outlet and this was a very physical acknowledgement that it has some sort of impact on the world, however small it is.


Inside the box there was a list of parts that it contained. At first I did not understand what some parts are (such as the USB programmer or the “cross shape servo arm”) however the docs on the website provide both pictures and videos that make it easier to follow along.

My Bittle arrived partially assembled so I was able to skip some of the build steps. You can see below how the legs and their servos were already attached together.

I underestimated the force required to put some of the screws in place. I would advise people to be careful not to apply too much pressure and instead patiently tighten the screws.
The instructions are very precise, especially around how the wires should be threaded through the body during assembly. Try not to get ahead of yourself the way I did or you will end up having to undo steps to correct your mistakes 😅.
No corners were cut in the plastic used for this product. It is sleek, sturdy and feels very nice to the touch. At one point I knocked the central body part off the table and it flew across the room. I was already dreading the fact that I would need to ask them to send me another part however the body survived the episode just fine, it didn’t even get scratched.

There were a few confusing moments in the instructions:
- At the end of part 4, just as you are instructed to connect the battery, the instructions send you to complete part 5 then return to part 4. Clarification from Petoi: This has been acknowledged and will be rectified
- The notes for how the legs are meant to be connected were confusing to me. The picture on the inside of the box helped in this regard.

- Calibration instructions were a bit unclear. It seems like you can calibrate it without using the app, however part 6 indicates that the dog should first be calibrated, then the legs need to be installed. The way it works if you are doing it for the first time is to do an initial calibration, then install the legs, then refine that calibration.
Clarification from Petoi: There are two kinds of calibration. First you calibrate the IMU, followed by initially calibrating the joints. Then, you attach the legs and then refine the calibration using the mobile app, Arduino code or desktop app.
Also to be able to perform Calibration I first had to update the firmware by connecting it to a computer.

Here I encountered a few issues due to my setup:
- I initially understood that there is a Linux version of the Desktop App, however I could not find a precompiled version of it on their GitHub link.
- Buried in the docs was an explanation for the above: you can use the Desktop App on Linux, you just need to download the source code instead of a pre-compiled version and run the script from a terminal after installing a few dependencies.
- There were some minor issues in the code: the code assumes that you are either on a Windows or a Mac machine,
avrdudeconfPathwhich you are instructed to modify did not exist and there was no release file for the1_2version of the nyboard (the one I was provided). Thankfully knowing a bit of Python I managed to work around these issues and I applied the1_1version instead.
Ultimately I was unable to complete the calibration from the desktop app as the program was always picking an incorrect COM port without giving me the option to choose the one I knew was correct (the screen which allows you to update the firmware gives you a choice with a dropdown). Instead I switched to using the provided bluetooth adapter and used their mobile app instead which was a much smoother experience.
When removing the USB cable from the USB adapter, do so CAREFULLY! It resisted me pulling it off and it felt very fragile to put more force on it. Instead, remove the USB adapter from the robot dog first, then remove the USB cable from the adapter.

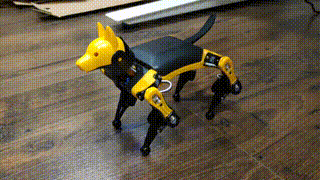
The dog was really coming together at this point. The last part of the build involves making it look as good as it does in the pictures on the website by covering up the board and by threading the wires of the leg servos through plastic covers that keep them out of the way. By the end, this robot dog looks amazing.
Here it is in comparison to the Freenove Robot Dog kit:

I was curious whether it would perform as good as it does in the website’s videos. The answer is - yes! After two rounds of calibration, the movement is really impressive.
The pack comes with an IR remote and pre-programmed actions which show the dog off doing actions such as pretend to pee or to wave. Here is how it handles itself on our hardwood floor:
Conclusion
This is clearly a product which has been heavily polished for a great user experience. I’ve passed on the issues I faced during the build to Petoi and I look forward to Part 2 where I will put this product through its paces by seeing how far I can push it in terms of speed and usability.
Interested in buying the Petoi Bittle? Go to the Bittle Robot Dog product page and then apply the code Simon7 at checkout to get 7% off your entire order! (Valid till May 14th, 2023).