The Petoi Bittle Robot Dog - Part 2
May 01, 2023
Introduction
This is part 2 of 3 of my review of the Petoi Bittle Robot Dog kit.
This kit was provided to me for free by Petoi in return for a review. I am thankful for the opportunity and had a blast reviewing this product.
In a first for my blog, read till the end to find a special discount code just for my readers: 7% off your entire order until May 14th 2023!
Part 2 of 3
I’m structuring these blog posts as follows:
- In part 1, I focused on the kit, its materials and the build process.
- In part 2 (this post), I will focus on the Python API and explore seeing how to make the dog do a trick from scratch.
- In part 3, I will install the Intelligent Camera Module and see how far I can take its hardware.
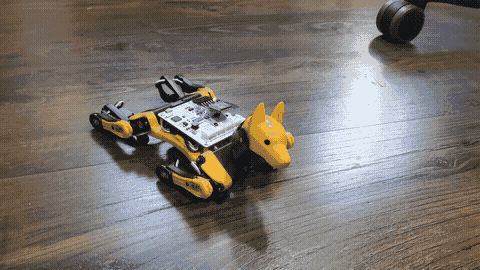
The dog so far
It turns out, having a robot dog around the house raises questions.
Every person who I showed it to were very interested in seeing how the Bittle handled itself.
What really wowed observers were the tricks that come pre-programmed into the Bittle. It is highly entertaining to see a robot dog doing push ups or pretending to take a pee. The latter one was especially entertaining to my three year old daughter who would start laughing out loud every time I made the dog do the pee trick.
Clarification from Petoi: Uploading the newest firmware will reveal new pre-programmed skills. These were added in anticipation of newer modules which will be released in due time.
The most interesting of them is the “play dead” action. All the other actions keep the dog on its feet whilst “play dead” causes it to topple over. Not only that, but the action then triggers a built-in self righting mechanism which flips the robot dog back onto its feet, ready to perform the next trick.
To trigger these tricks, you can use the provided Infra Red Remote which comes with the kit itself:

Alternatively, you can use the mobile app too:

In general I found the app to be more useful since with the IR remote you need to make sure that you point it at the rear of the dog, which can become obscured relatively easy. It is also easily obscured by the tail that you can attach at the back of the dog, which I ended up removing at some point to make the IR remote more responsive.
Clarification from Petoi: The IR remote was originally intended as a debug interface. The app is recommended for more sensitive and one-to-one control of the Bittle.
Teaching a new dog new tricks
Part of why this product drew my attention was that the company advertised the availability of a Python API. Being a full time Software Engineer who primarily works in Python as well as an ex-organiser of a Python meetup, this was definitely my ideal option to interact with the Bittle and begin to control its behaviour programmatically.
In this part I will briefly explore two methods:
- Using the Python SerialMaster approach
- Using the ESP8266 + Python Scripts approach
Python SerialMaster
In case it is unclear, as it is not stated in the docs, these instructions require you to find the scripts contained in the OpenCat Repository.
I decided to use the Bluetooth method to avoid having to stay plugging into the Bittle. The docs only show examples for using Windows, so I had to do some extra steps on my Ubuntu machine. First I paired with the Bittle via the GUI which gave me its MAC address:

I then tried to setup rfcomm following these instructions so that I could access the bluetooth connection as a serial port. This however, took much longer that expected.
Using bluetoothctl I could see that I was definitely paired with the Bittle. By running sudo rfcomm bind 0 D8:71:4D:96:C4:3A I could finally see the rfcomm0 file, however the script was failing with a Permission Denied error. With some more googling, I figured out I needed to run sudo chmod a+rw /dev/rfcomm0.
On attempting to run the script, it seemed to always attempt to first connect to /dev/ttyS0, so I changed the script using the following line allPorts = [p for p in allPorts if p != '/dev/ttyS0']. Even then however, connecting to /dev/rfcomm0 still continued to fail.
At that point I switched back to the USB method.

It seemed that the auto-selection of the serial port was never completing, causing me to have to go through manual mode every time:


Even then, the script was throwing exceptions related to tkinter, the GUI framework used for this script:
    tk.messagebox.showwarning(title='Warning', message=txt('Manual mode'))
AttributeError: module 'tkinter' has no attribute 'messagebox'
/dev/ttyACM0
ttyACM0
2023-04-20 18:10:12,095 __main__ - INFO - Connected to serial port: /dev/ttyACM0
Exception in Tkinter callback
Traceback (most recent call last):
  File "/home/simon/Projects/OpenCat-1.0.2/serialMaster/ardSerial.py", line 712, in selectList
    tk.messagebox.showwarning(title='Warning', message=txt('Need to manually select the model type (Nybble/Bittle)'))
AttributeError: module 'tkinter' has no attribute 'messagebox'
At this point I was pretty frustrated with the wired approach, so I decided to move onto the next option. I didn’t regret it. 👇
Clarification from Petoi: Due to the many variants of Linux, testing was mainly done on Windows/Mac. Work will be done in due time to improve the auto-connection algorithm when interacating with the Bittle via bluetooth.
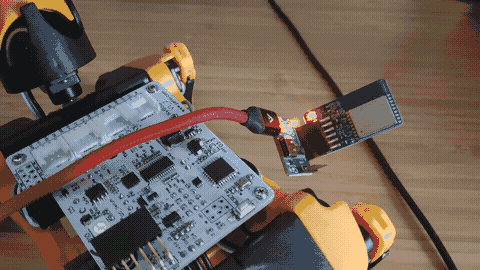
ESP8266 and MicroPython
This option involved the use of the ESP8266 chip which came packaged with the robot, programming it with a version of Python capable of running on micro-controllers: MicroPython.
The first step was to download the latest firmware and update the board as outlined in the docs. This approach was much smoother as all of the steps worked on the first try.
I was reluctant to use Thonny as it would mean having to learn a separate IDE from VS Code, however in the interest of following the instructions comprehensively, I downloaded and installed it. I opted for this approach as I was focusing on using the Python method - there is also the option to use the Arduino environment if one is more familiar with that.

Within ten minutes, I had a python script which made the LED on the board blink. Running this code reminded of the very first time I ran code on an Arduino, several years earlier, also making it simply blink an LED.
Following the high of getting blink to work, I used the example script from the docs to see that the board, now running MicroPython, will be recognised by the Bittle.
Here it is running the example script:
As outlined in the docs, disconnecting and reconnecting the ESP8266 every time you want to change some code and observe the effect is very cumbersome.
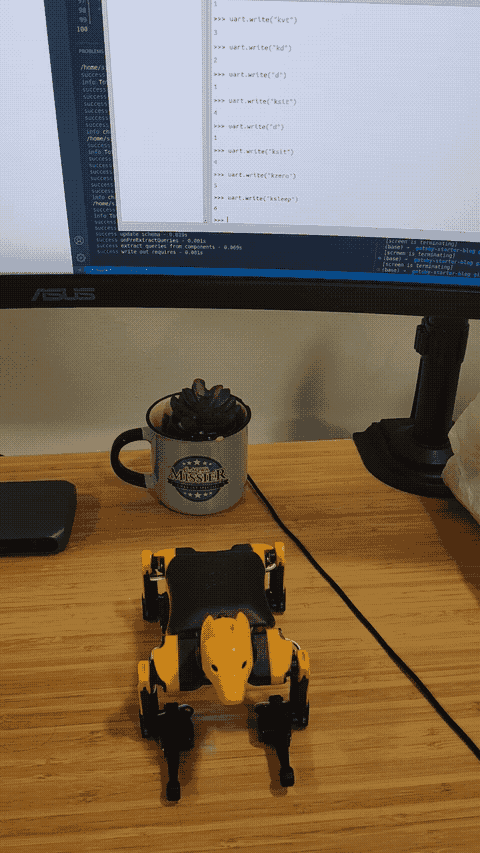
The solution presented is to use the WebREPL. I was very impressed that, following the docs, I was now running my blink script over Wi-Fi!
Re-installing the ESP8266 into the robot presented an issue - it started crashing after a while and hanging, playing a beeping sound over and over. Fixing this issue is covered in this part of the docs. After applying the fix I thought I had broken something since my terminal was no longer returning any output. Eventually I realised, it was working as intended! (the fix disables the debug output which eventually crashes the board). This allowed me to run the example script file from my desktop onto the robot itself, wirelessly!
A tip while working with the WebREPL: understanding how to find out whether the board has connected to your WiFi via your router’s web UI is very useful to know whether any issues connecting to the board are because the board is still booting and connecting or in the software.
Now that I could run the WebREPL, I read through the example script to understand how to control the behaviour directly. Using the following code and this list of skills led me to success!
Conclusion
Now that I could control the Bittle programmatically from a language that I was familiar with, I was already beginning to daydream the kind of applications I could use the Bittle for. Given my current focus on AI and Machine Learning, I can see myself experimenting using ML to drive the Bittle and to begin to give it a life of its own. Interestingly, Petoi provide a Universal Robot Description Format of the Bittle, which is a useful resource to run simulations of the Bittle for the purpose of ML training.
Speaking of AI and ML, the final part of this series of blog posts will explore using the Intelligent Camera Module. I intend on seeing how good the eyes of this dog can be.
Interested in buying the Petoi Bittle? Go to the Bittle Robot Dog product page and then apply the code Simon7 at checkout to get 7% off your entire order! (Valid till May 14th, 2023).