The Petoi Bittle Robot Dog - Part 3
May 11, 2023
Introduction
This is part 3 of 3 of my review of the Petoi Bittle Robot Dog kit.
This kit was provided to me for free by Petoi in return for a review. I am thankful for the opportunity and had a blast reviewing this product.
In a first for my blog, read till the end to find a special discount code just for my readers: 7% off your entire order until May 14th 2023!
Part 3 of 3
I’m structuring these blog posts as follows:
- In part 1, I focused on the kit, its materials and the build process.
- In part 2, I will focus on the Python API and explore seeing how to make the dog do a trick from scratch.
- In part 3 (this post), I will install the Intelligent Camera Module and see how far I can take its hardware.
Who has eyes to see
The kit I received included the MU Vision Sensor. Given my current study unit for my MSc. in AI is related to computer vision, I thought this would be a great opportunity to stretch my skills.
Following the docs, I updated the firmware of the Bittle to be able to support the camera. The only issue I had here was that I had to update the following line in the code: pathBoardVersion = "NyBoard_V1" for the firmware upload to complete.
Once the firmware was updated, I plugged the camera in and mounted it on the Bittle itself.
Previously I had noted that the Bittle is highly durable. This is still the case, however the camera module is mounted outside of the frame of the dog, using a rubber band to attach it to the plastic bone that comes with it and the bone is held in place by the Bittle’s mouth. Without the camera module I was being pretty liberal in how I treat the Bittle, however with the camera module hanging out front, mostly unprotected, I began being much more careful with it. If there was a protective enclosure I could purchase or 3D print to provide some protection I definitely would consider using one.
Turns out, there is one available, they’re just not listed in the docs. A comment in camera.h within OpenCat points to the following link which is an STL to 3D print a mount for the camera that does not require use of the plastic bone.
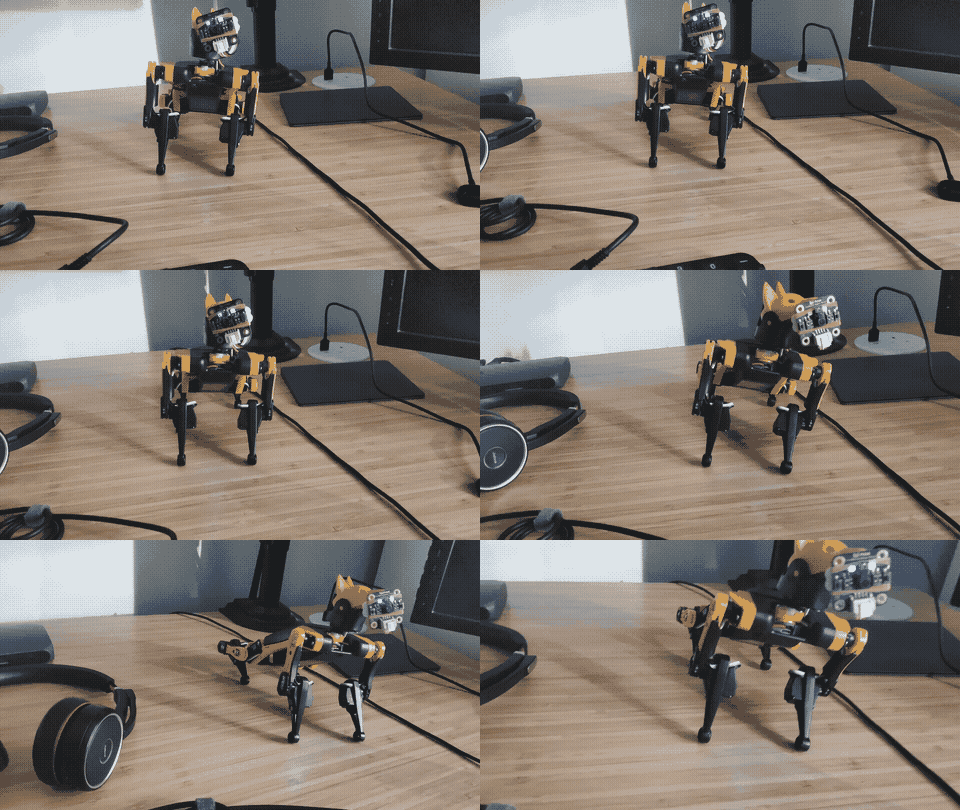
Upon turning the Bittle on, despite expecting it to do what it did, I got freaked out! The Bittle instantly recognised me in front of it and started tracking my movements.
Its a bit hard to appreciate the fluidity of the movements in the quality of this gif. I recommend checking out the following YouTube video demonstrating its movement - it is very accurate to my experience!
Trying to make it work
The default behaviour of tracking humans or tennis balls is amusing to see. I wanted to see how easy it would be to try and run an ML model on the image stream coming through the camera.
Here I realised that there are some limitations if you want to continue to operate at a Python level.
I was expecting being able to install a pypi package and begin to print at least some output from the camera at the console, that would then allow me to try out approaches such as running a very light ML model on the ESP8266 that adjusted the behaviour of the Bittle on the fly, or streaming the images over HTTP and controlling the Bittle remotely, allowing me to run larger ML models on my machine.
Unfortunately I was unable to find an easy way forward with this approach. In fact, a question on the forums indicates there is no way of doing it this way at present.
Having said that, it looks like it is possible with more time and effort than I could dedicate. I read through the Arduino sketch available and it is likely not too hard to change it to send these values over i2c to the micro-controller. There’s also a lesson in the Tinkergen Bittle Course covering how to use scratch to make the Bittle react to hand gestures.
Unable to proceed in a practical way, I thought it would be useful to turn this into a system design exercise, theorising the methods I could potentially leverage the camera to adjust the Bittle’s behaviour and the various trade-offs each setup would have.
Computing with one eye and four legs
Here’s the possible ways I would have approached this problem:
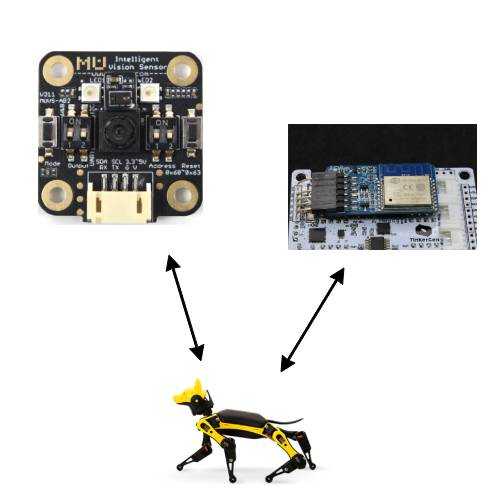
- Running everything locally on the micro-controller
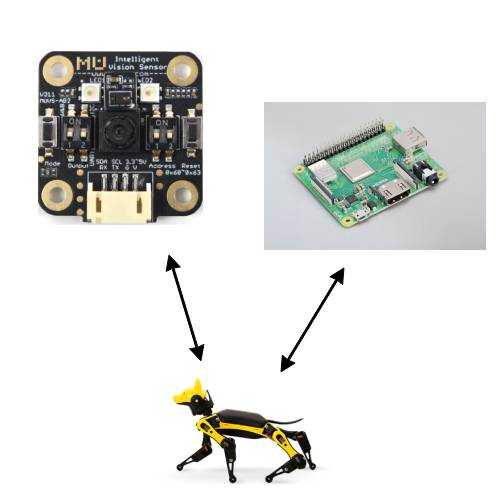
- Running everything locally on a Raspberry Pi
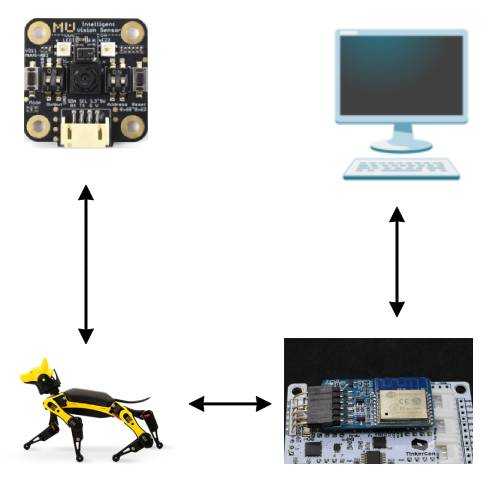
- Streaming the image data to another machine through the micro-controller/Raspberry Pi
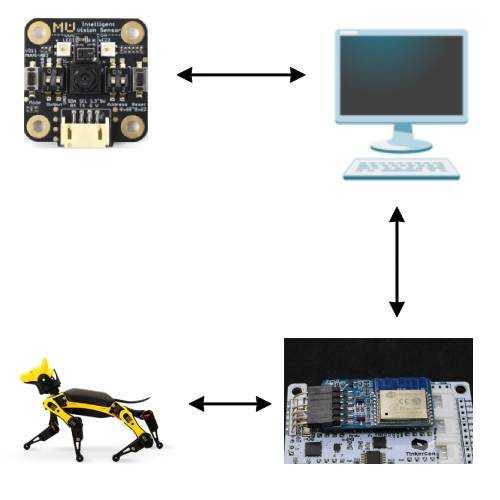
- Streaming the image data directly from the camera to another machine and controlling the Bittle from that machine
- A mix of the above
Running everything locally on the micro-controller
This is the setup that I tried to implement above. It is the simplest setup possible whereby the camera is simply feeding what it receives to the controller and the controller decides its output based on that.
There are two main constraints in this kind of setup: CPU clock speed and RAM.
The micro-controller provided looks like an ESP wroom o2d which, according to the dataset, reaches a maximum clock speed of 160MHz (only 80% of which is usable) with <50kB of RAM available.
This is a world away from the kind of resources that are available on SoCs, Laptops and Servers. One might be able to fit a very simple neural network within these constraints, however the behaviour it would be able to exhibit is exceedingly limited.
Running everything locally on a Raspberry Pi
The Bittle has the option to be run from a Raspberry Pi. This would bring it closer to the Freenove Robot Dog. Once you have an ARM CPU, an SD card, Megabytes worth of memory and a standard Linux OS, then running ML models become more viable.
There is however more advanced work involved in getting this to work:
- You need to solder a socket to the NyBoard
- You will be unable to install the back cover of the Bittle, which makes the RPi susceptible to damage if the Bittle topples itself over
- Petoi provide a file for a 3D printable Pi standoff to help keep it steady
Streaming to another machine via the onboard controller
In this scenario, we would take the output from the camera and, using the micro-controller, stream the images to another machine. The machine would then provide instructions to the Bittle over a protocol such as WebSockets
The advantages of this approach are:
- We are no longer limited by the compute of the Bittle
- We can run any size ML model we want on the other machine
- We can potentially control multiple Bittles at once
The disadvantages of this approach are:
- We need to maintain the wirless connection (whether Wi-Fi or Bluetooth) with the other machine at all times to provide the upgraded behaviour
- If we lose the wireless connection then the Bittle will either freeze or continue whatever it was doing before
- The latency may be too high to provide life-like reaction times
Streaming to another machine directly from the camera
It turns out that the MU Vision Sensor 3 allows for direct Wi-Fi connection since it runs an ESP32 micro-controller. It even allows for MicroPython to be used!
In this scenario, we would connect the camera and the Bittle both to the same WiFi network and have the machine ingest the images directly from the camera and then send commands to the Bittle.
The advantages of this approach are:
- We may achieve better throughput in terms of reaction time, since the Bittle’s micro-controller is not switching between streaming the images and adjusting its behaviour
The disadvantages of this approach are:
- Instead of one wireless connection, we are now using two. This means double the opportunity for flaky or slow connections to interrupt the control of the Bittle
A mix of the above
We can attempt to find compromises between the advantages and disadvantages of the above setups by mixing and matching.
One potential way of doing this would be to have different tiers of behaviour - a simple movement behaviour which is solely controlled by the micro-controller, but is also influenced (but not directly controller) by a separate machine performing computer vision tasks. This way, if either one or both WiFi connections are slow or lost, the Bittle’s core loop keeps running uninterrupted on the micro-controller and then re-synchronises once the connection is restored.
Conclusion
The Petoi Bittle is a great piece of hardware, truly a good product to explore programming, robotics and STEM topics, especially with older children. The price tag (~$300) is higher than other similar products but the quality is very much apparent.
The setup process might need a bit of polish if you are running from a Linux machine - it is my understanding that I could have avoided these issues if I used a Windows or Mac one.
Big thanks to Petoi for entrusting me with this review!
Interested in buying the Petoi Bittle? Go to the Bittle Robot Dog product page and then apply the code Simon7 at checkout to get 7% off your entire order! (Valid till May 14th, 2023).
